


Set Up
Getting Started:
General Environment
Blogging software works on a server. This is not a PHP class, so it is optional whether you want to have a local server such as XAMPP or not. You should, however, have your server space set up. The instructions below will help you set that up.
Codecs Upgrade for Video/Audio
Today, most modern media players on Windows and Mac include codecs needed to play most media content types including YouTube videos. With new advancements in video technology, it may become necessary for you to upgrade the codecs that come with your operating system. If you have any difficulty viewing the course videos, this is very likely the reason. The solution could be as simple as updating your media player to the latest version to resolve any issues. Please be sure to reach out to the instructor, Colin Keane (colin@studyanywhere.ca), if you have any issues viewing the course videos.
Print Screen Tools
Here are some fast little tools that can be used to take screen captures. Your instructor will be showcasing how to use a screen capture tool on a Windows operating system for JPG assignment submissions. Mac users, please see the note below.
Windows Users
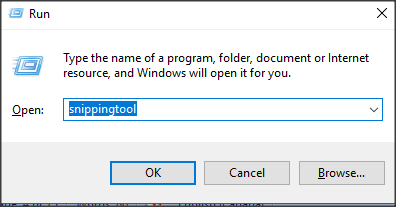
The Snipping Tool is installed by default in Windows and can be accessed easily by pressing the Windows + R keys, which will pop up the run command window. Searching for ‘snippingtool’ will open the Snipping Tool. For instructions on how to take a screenshot using this tool, visit https://support.microsoft.com.
When the Snipping Tool opens, it allows you to take still screenshots of an open window, rectangular areas, a free-form area, or the entire screen.

Mac Users
A Mac operating system comes with a very functional built-in screen capture utility, so there is no need to download and install a separate program. To take a screen capture, press the keys Command + Shift + 4, move your cursor to where you want to start the screen capture, click and drag to select the area, and when you have selected the area you want, release your click. You will find your screenshot saved as a .png file on your desktop.
Create A Working Folder and How to Edit Assignments
To ensure a safe backup of all your material, create a Blogging folder on your desktop. For all the graded assignments, prepare your answers in Notepad or WordPad and save your work to your Blogging folder. Then Copy your answer and Paste it into the Moodle text editor, remembering to hit Save Changes when you are done. If there is a requirement to upload a full document, you will be notified within the assignment request.
FTP Program Download
If you require an FTP program please download this one: Cyberduck for Windows or Mac.
Add Your Blogging Publishing Folder at the Web Server
Let's start with some background information on the web server for this course (studentuploads.ca) and how you will use it. As you will already be quite aware, you have your own folder at this server, which is protected with a username and password. Recall the email you received from us with three important pieces of information: your folder name, your FTP username, and your FTP password. Please locate the information now.
The purpose of your folder at the web server is to hold all the content that you publish during the Advanced program (and is visible on the internet). FTP is the protocol that is used on the internet to transfer files from local computers (like your home computer) to a web server at a remote location, and publishing to the internet requires third-party FTP software. Our web server is located in Eastern Canada, and you will be using the FTP protocol to transfer files to this web server.
Configure Cyberduck
Now, let's configure Cyberduck to access your designated publishing folder. Open Cyberduck and select Open Connection at the top-left of the dialog box. Fill in the four fields as listed below. Then click the Connect button once.
- Host: ftp.studentuploads.ca
- Username: firstl@studentuploads.ca (No capital letters or spaces. Refer to the email containing your username.)
- Password: your_password (Refer to the email containing your password.)
- Port: 21
If you see the Unsecured FTP Connection message, click Continue.
Once connected, you should see Cyberduck launch and your username at the top-left of the Cyberduck window.
Now right-click (or Ctrl+click on Mac) and select New Folder. Name your directory 209 and click Create. This directory will be your publishing folder for this course. You will be placing most of your work for this course into this folder. Once your publishing folder is created, click Disconnect at the top-right of the screen.
Please proceed to the Assignments Page before starting the assignments.