


Chapter 5 Exercises
Exercise 5: Encoding and Decoding Scripts
In Chapter 3, HTML Forms and PHP, Exercise 7: Manually Sending Data to a Page demonstrated how to use the thinking behind the GET method to send data to a page by appending it to the URL. You used this technique to send a variable with a single word value. But what if you want to pass several words as one variable value?
In these instances you can use the urlencode() function. As its name implies, this function takes a string and encodes it (changes its format) so that it can properly be passed as part of a URL. The function replaces spaces with plus signs (+) and translates special characters (for example, the apostrophe) into less problematic versions. The syntax for this function is:

In this exercise you will rewrite the handle_post.php page, adding a link that passes the user’s name and email address to a third page. Then you will create a new page called thanks.php.
Note: A number of Helpful Tips are located at the end of this web page for reference as you complete this exercise.
To use urlencode():
- Using Synapse to connect to the production server, open handle_post.php (Script 5-4) in Brackets.
- If you want, delete the htmlentities() and strip_tags() lines added in the previous task. You can also revert to the older version of the print() statement.
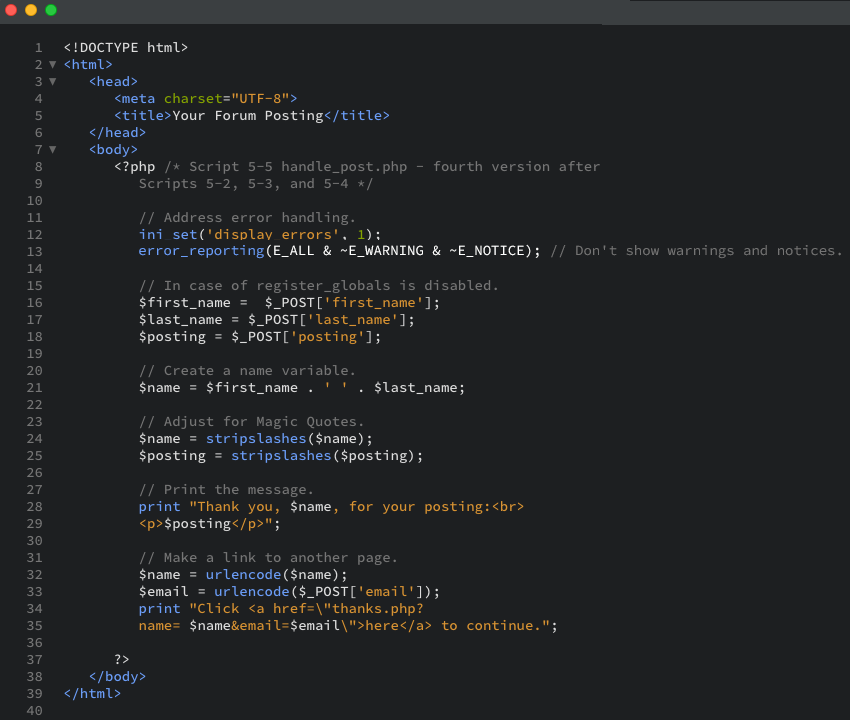
Script 5-5: This script encodes two variables before adding them to a link. This way, the variables are successfully passed to the other page.
- After the print() statement, add the following:

This script will pass these two variables to a second page. To do so, both variables must be encoded. Because you have not yet referred to or used the $email variable, the second line both retrieves the $email value from the $_POST array and encodes it in one step. This is the same as having these two separate lines:

- Add another print statement that creates the link:

The core purpose of this print() statement is to create an HTML link in the web page, the source code of which would be something like:

To accomplish this you need to hard code most of the HTML and then include the appropriate variable names. Because the HTML code requires that the URL for the link be placed in double quotation marks—and the print() statement already uses double quotation marks—you must escape them so they are printed. - Save the script, again as handle_post.php. Since you have opened this page straight from the production server using Synapse, your changes will be applied right on the production server by simply pressing Ctrl-S (Cmd-S on a Mac). This means that you don’t need to use FTP.
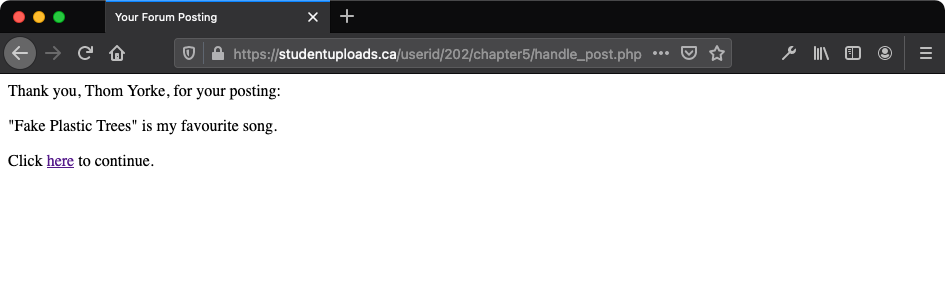
- Switch over to your browser, refresh, and test the file there (Figures 5-11 and 5-12), ensuring it is saved in the same location as posting.html, and ensuring you are looking at the production server version of the file.
Figure 5-11: Another use of the form.
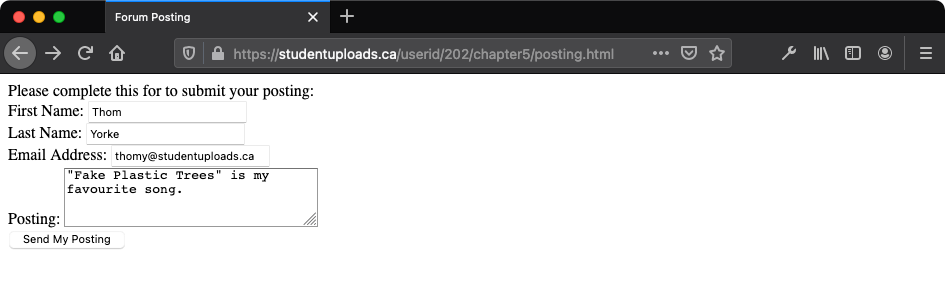
Figure 5-12: The handling page now displays a link to another page.
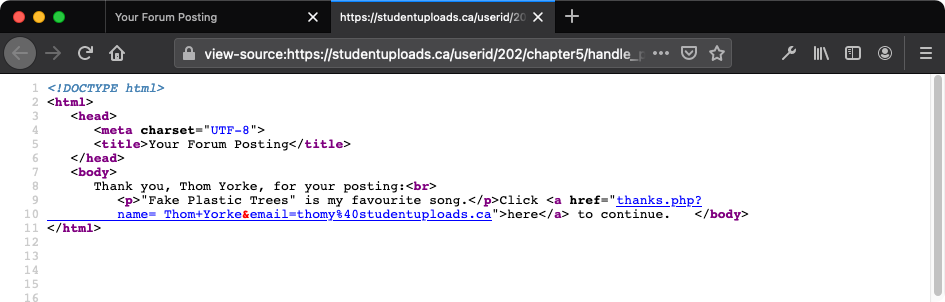
- View the HTML source code of the handling page to see the resulting link in the HTML form (Figure 5-13).
Figure 5-13: Check the page’s HTML source code to confirm that the link is as it should be.
- If your file needs editing, you can continue editing and saving your changes in Brackets, then just switching to your browser and refreshing the page. Since you have opened this file straight from the production server using Synapse, your changes will be applied right on the production server. This means that you don’t need to use FTP.
Just in case it is not clear, we will now quickly write the thanks.php page to which users are directed when they click the link in handle_post.php (see Figure 5-12).
To write thanks.php
- You will create a PHP script (Script 5-6).
Script 5-6: The thanks.php script prints a greeting based on two values it receives in the URL.

- To begin, create a new HTML document (Script 5-6) with the title Thanks!:

- Create the initial PHP tag:

- If necessary, address register_globals and error handling:

Because the variable values will come from the URL and not from an HTML form with the POST method, you use $_GET instead of $_POST. - Print out a simple message:

- Complete the PHP code the HTML page:

- Save the page as thanks.php to your XAMPP folder (c:\XAMPP\htdocs\202\chapter5).
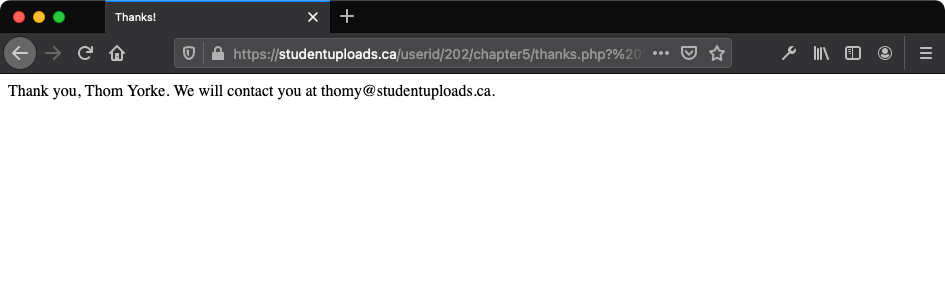
- Using Cyberduck, upload the file to the production server, and test in your browser by clicking on the handling page (Figure 5-14), ensuring that you are looking at the production server version of the file, and ensuring it is saved in the same location as posting.html.
Figure 5-14: The handling page prints a message based on values it receives as part of the URL.
Important: If something doesn’t look right in your document, and you need to make changes to the script, follow the editing procedure using Synapse outlined in Chapter 1.

- The urldecode() function does just the opposite of urlencode(). It takes an encoded URL and turns it back into a standard form. You will use it less frequently, though, as PHP will automatically decode most values it receives.
- Since you can use concatenation with functions, the new print() statement could be written as follows:

This method has two added benefits. First, it uses single quotation marks to start and stop the statement, meaning you will not need to escape the double quotation marks. Second, the variables used are more obvious—they are not buried in a lot of other code. - Remember that values sent directly from a form are automatically URL-encoded prior to being sent and decoded upon arrival at the receiving script. You only need the urlencode() function to manually encode data (as in the example).